Tag Archive for: Head Nurse

Mastering change with Kotter’s 8-Step approach in veterinary practice

You discover a smart solution to a meaningful problem, only to face the toughest challenge yet: getting people to change. In this how-to article, we’ll go through a simple and popular method which you can use to win the hearts and minds of your colleagues in practice – helping you successfully implement your next improvement project.
What is it?

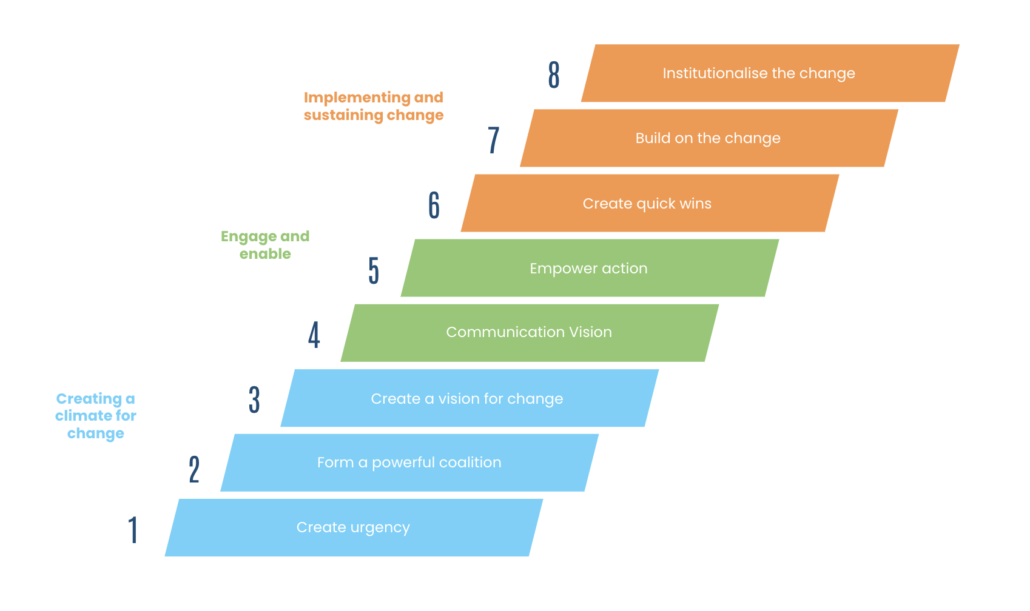
Developed by Harvard Business School professor John Kotter and introduced in his 1995 book, “Leading Change,” this method comprises an 8-step plan designed for any change leader to follow. These steps are to be used at the very end of your project when implementing a solution.

Why use it?

After spending lots of time and effort getting to the point of implementation, the Kotter 8-step approach helps maximise the chance of adoption so that you can start seeing results.

How’s it used?

Step 1: Create urgency

Spend time crafting a message around the need for change. Consider both the ‘push’ (reasons to move away from what you’re doing) and ‘pull’ (benefits you’ll gain from the change) factors. Use data where possible to highlight any key points.

Step 2: Form a powerful coalition

Assemble a team to lead the change, focusing on team building and defining roles. Ensure the core team is proficient in explaining the change with consistent language.

Step 3: Create a vision for the change

Craft a high-level narrative linking the change to company values, vision, mission, or strategy. Keep it simple and easy to understand, providing a rationale for the change.

Step 4: Communicate the vision

Communicate the message dropping it into conversations and incorporating it into daily behaviours. Make it a topic that people feel comfortable asking you about and be transparent when answering questions on how it might impact them.

Step 5: Remove obstacles

Shift from creating messages to implementing structures that facilitate change. This may involve hiring new staff or buying new equipment. Acknowledge and praise those embracing the change, while identifying and addressing obstacles, including outdated processes or behaviours. Be on hand to provide ‘hypercare’ for those adopting the new system. 

Step 6: Create short-term wins

Build momentum by achieving small wins, which serve as building blocks for significant change. These wins offer tangible evidence of progress, establish a pattern of success, attract allies, and deter opposition. Use these wins as learning opportunities to spot barriers and facilitators.

Step 7: Build on the change

Embed the change by incrementally building on these small wins. Do this by gathering peoples feedback into a ‘backlog’ of ideas and decide what to prioritise based on effort and impact.

Step 8: Institutionalise the change

Enhance the visibility of the change and its results. Measure and communicate results. Share success stories illustrating how the change has improved lives and work efficiency. Recognise and celebrate teams or staff members who played a crucial role in the change.

Example

Nikita is a lead nurse. Her practice recently had its RCVS Practice Standards assessment. The assessor gave the practice a deficit for wearing outdoor shoes in theatre. Nikita is tasked with addressing this deficit. She uses Kotter’s 8-step method to help manage the change:

Step 1: Create urgencyNikita starts by crafting a message and posts it on the staff notice board. The message explains the team have 3 months to address the deficit or risk loosing their accreditation
Step 2: Form a powerful coalitionNext, she identifies a core team to help her. She meets with the theatre nurse and clinical director to agree the plan and rehearse the key messaging together
Step 3: Create a visionDuring the meeting, they also decide to tie the change in with an existing practice goal to increase its surgical caseload. They set the change as a milestone in their practice action log
Step 4: Communicate the visionOver the following weeks, they talk about the change during daily huddles. Nikita reminds her colleagues on the number of weeks remaining to implement and evidence the behaviour change to the RCVS
Step 5: Remove obstaclesNikita coordinates with the practice manager to buy indoor shoes for the team and install a shoe rack. She also adds signage to the entrance of the theatre to remind the team not to enter with outdoor shoes on
Step 6: Create quick winsNikita decides to communicate the purchase of shoes and fitting of the rack as  ‘phase 1’ and celebrates the accomplishment with the team during the daily huddle
Step 7: Build on the changeDuring the huddle Nikita realises that some staff members don’t like sharing shoes and are being vocal about it. She decides to update the plan and asks her colleagues to select a pair of shoes and label them
Step 8: Institutionalise the changeThe change becomes the norm and Nikita uses a practice meeting to update the team on its success. She thanks everyone for their hard work, especially those who were impacted the most. SOPs and policies are updated to reflect the new way of work

Top Tips

  1. During the initial stages, capture your key message on a presentation slide to help condense it down. Rehearse the key message with the core team so you can deliver it quickly and confidently.
  2. Prioritise quick wins by adopting an ‘Agile’ approach. Focus on delivering the ‘minimum viable product’—a basic solution with the most significant impact. Plan for refinement in subsequent ‘phases’.
  3. Ensure long-term success by keeping documentation up to date. Update any standard operating procedures (SOPs) and archive older versions. Don’t underestimate the work involved in this step!

Kotter’s 8-step method offers a proven and reliable approach for implementing change in any practice. For additional support in change management or assistance with specific challenges, reach out to VetQI

Where to begin on your quality improvement journey in practice

Are you eager to do some quality improvements but find the sheer number of potential improvement opportunities overwhelming?

In this blog article, we’ll identify six key areas to begin your improvement project, complete with practical examples. By the end, you’ll feel confident and ready to embark on your journey.

Aligning with Strategy 

When diving into your improvement project, remember that quality goes beyond the shop floor. Companies that value quality also have big-picture strategies that dictate where staff should be prioritising their time. If you want to get noticed by ‘higher-up’, align your project with your practice or company’s plan.

For instance, let’s take the practice’s goal to increase high-value procedure sales. Karen, a new nursing team leader, noticed her new employer isn’t doing as many dental X-rays as her previous practice, despite having all the equipment and a similar caseload. Karen teamed up with the practice manager to test a new pricing model that bundles together dental procedures and X-rays. She closely watched how this impacted sales.

Profit and Loss

Most organisations, including charities, are concerned with understanding their costs and how well they cover them with sales. So, any improvement project that targets these areas is a smart choice and is easy to demonstrate results. Don’t let financial metrics intimidate you; it’s all about finding ways to cut costs or sell more in the same time.

Consider Sally, the surgery nurse. She noticed that the practice was using costly 1ml syringes when the larger cheaper variety would do. She added clear signage to the drawers, encouraging her team to ‘think twice’ when grabbing a syringe. She monitors the number of syringes ordered and compares it to previous months.

Reducing Defects 

In the veterinary world, “defects” can be seen as things that didn’t go as planned. A common example includes significant events, animal mortality, avoidable morbidity, and resulting client complaints. When these occur, the impact can be significant. A quality-driven team seizes this opportunity to investigate what went wrong in a blame-free environment and works on improvements to prevent such incidents from happening again.

For instance, consider Martin, the in-patient nurse. He takes over a shift and notices that a cat with an indwelling urinary catheter is in pain and the bladder isn’t draining properly. After the team resolve the situation, Martin conducts a root cause analysis with the team. Together, they develop a new standard operating procedure (SOP) for managing blocked cats, which involves doing an additional check on the bladder every 4hours.

Listening to the Voice of the Customer (VoC)

Maintaining a strong relationship with our customers is crucial in making sure our patients get the treatment we reccomend at home and also supporting the practice financially. Customers interpret quality in different ways so its important to research and understand what your customer value.

In the example above, Karen introduced a new pricing model, bundling all dental X-rays into dental procedures as a value-added package. After conducting a client survey, she found that some customers didn’t fully appreciate this change. In response, she piloted a new way of work in which the team sends the dental X-rays to the customer after the procedures in order for them to see what was done. She repeated the survey 6 months later. 

Listening to the Voice of the Employee (VoE)

The practice team are close to the action and can provide valuable “bottom-up” perspectives on opportunities for improvement. But listening to all their suggestions and effectively managing their ideas is a skill in itself. It’s important to develop this skill to develop a culture of ‘continuous improvement’ amongst the team.

Consider Chloe, the practice manager. She regularly receives improvement requests from her staff but finds it challenging to handle them all. In a quality improvement effort, she created a closed suggestion box and provided template cards for her team to submit suggestions. On a monthly basis, she shortlisted the ideas that aligned with the practice’s strategy and presented them to the team for voting on the “quickest win.”

Pareto Principle (80/20 Rule)

The Pareto Principle, often referred to as the 80/20 rule, suggests that 80% of the effects come from 20% of causes. This principle is a valuable tool in quality management as even small or margin improvements in the 20% will result in substantial results.

Sandy, the receptionist, realises the team leaves the desk on average every 15 minutes. Half of the time they are going to the printer. She does an improvement project which moves the printer within safe reach of the desk. She compares the number of time the team leave the desk before and after. 

Deciding the right opportunities to work on when you have so little time can be tough, but by using the above themes you can rationalise your decisions and get your project off to a confident start. These themes can also be used to help facilitate a meeting where you collect idea’s within the team. 

If you need any support in making quality improvements, Contact VetQI—we’re here to help.

Essential temperature monitoring solutions for your medicines

This article will cover the importance of monitoring your medicine’s temperatures, especially for your upcoming RCVS Practice Standards Scheme (PSS) or Veterinary Medicines Directorate (VMD) assessment.

Why is temperature monitoring for medicines so important? 

To keep your medicines working effectively, you’ll need to store them at the right temperature as described in their specific product characteristics (SPC). Monitoring the temperature of all the medicines you store on-site can be a big challenge especially as they can be stored away in different rooms and draws across the practice.

What’s required for the RCVS Practice Standards Scheme (PSS)?

For those participating in the scheme, it’s a core requirement to monitor the ambient temperature of your medicines and quickly respond if it deviates outside of the reference range. It’s also important to record and store the temperatures you monitor for auditing purposes. Prior to the assessment day, your inspector will ask you to upload your standard operating procedure (SOP) for monitoring and responding to temperature changes. On the day of the assessment, your inspector will also want to see all the areas you store medicines and check you have the right systems in place.

What solutions are out there to help?

There are various solutions to help you manage and record the ambient temperature of your medicines. These include min-max thermometers, data loggers, and cloud-based temperature monitoring. Some of the key characteristics of these are summarised below. 

  1. Min-max thermometers
  • The manual approach for temperature monitoring involves daily readings from a specific thermometer which stores the minimum and maximum temperature within a given period. Staff record this down once daily e.g. in a paper book or laminated table and then reset the device
  • Pros: It’s low cost and quick to set up
  • Cons: dependency on staff, difficulty in analysing data, and environmental impact of paper and laminating

2. Data loggers

  • These USB stick devices are used to monitor temperatures in specific areas, store data on themselves, and notify using an alarm or flashing light if it deviates from a set range 
  • Pros: They save staff time and provide a rich amount of data for analysis
  • Cons: Upfront investment cost in the technology and dependency on staff to collect and download the data weekly

3. Cloud-based monitoring

  • Small devices are placed in different locations and sync temperature data via the internet to a cloud-based storage system, triggering notifications such as an email or push notification if temperatures deviate from a set range
  • Pros: A further saving on staff time and often built-in analytics for the stored data
  • Cons: The highest upfront investment costs and reliance on a reliable internet connection

When it comes to considering which system to go with, it’s not only important to consider the direct staffing cost if manual checks are involved but also the opportunity cost, which is the potential of using them elsewhere.

5 Top tips for monitoring and recording medicine temperature 

  1. Take care of storing medicines near heat sources like radiators, printers, and lab equipment
  2. Place fridge thermometers inside a Tupperware to limit the impact of opening and closing the fridge door
  3. Assigning temperature monitoring responsibility to a specific shift or role can improve compliance
  4. Centralise the storage of medicines when possible to minimise the effort of monitoring and recording
  5. Don’t forget to monitor the meds stored in the controlled drugs cabinet, reception, and crash kit!

In summary, monitoring medicine’s temperatures correctly at your practices is key to essential to keep them working effectively. There are different solutions out there that can help you depending on the level of investment you want to make. Keep in mind that investing upfront in a more automated solution will improve compliance and free your team up to do more rewarding work.

VetQI can provide expert support in choosing the right system for a practice’s needs, especially when it comes to upcoming PSS assessments. Contact VetQI for more information