Mastering change with Kotter’s 8-Step approach in veterinary practice
You discover a smart solution to a meaningful problem, only to face the toughest challenge yet: getting people to change. In this how-to article, we’ll go through a simple and popular method which you can use to win the hearts and minds of your colleagues in practice – helping you successfully implement your next improvement project.
What is it?
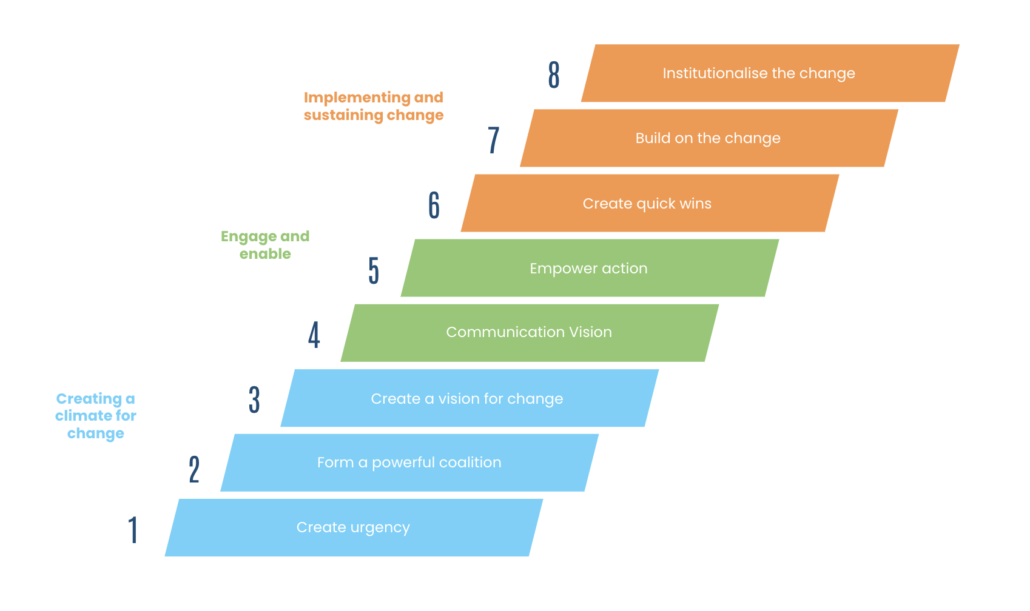
Developed by Harvard Business School professor John Kotter and introduced in his 1995 book, “Leading Change,” this method comprises an 8-step plan designed for any change leader to follow. These steps are to be used at the very end of your project when implementing a solution.
Why use it?
After spending lots of time and effort getting to the point of implementation, the Kotter 8-step approach helps maximise the chance of adoption so that you can start seeing results.
How’s it used?
Step 1: Create urgency
Spend time crafting a message around the need for change. Consider both the ‘push’ (reasons to move away from what you’re doing) and ‘pull’ (benefits you’ll gain from the change) factors. Use data where possible to highlight any key points.
Step 2: Form a powerful coalition
Assemble a team to lead the change, focusing on team building and defining roles. Ensure the core team is proficient in explaining the change with consistent language.
Step 3: Create a vision for the change
Craft a high-level narrative linking the change to company values, vision, mission, or strategy. Keep it simple and easy to understand, providing a rationale for the change.
Step 4: Communicate the vision
Communicate the message dropping it into conversations and incorporating it into daily behaviours. Make it a topic that people feel comfortable asking you about and be transparent when answering questions on how it might impact them.
Step 5: Remove obstacles
Shift from creating messages to implementing structures that facilitate change. This may involve hiring new staff or buying new equipment. Acknowledge and praise those embracing the change, while identifying and addressing obstacles, including outdated processes or behaviours. Be on hand to provide ‘hypercare’ for those adopting the new system.
Step 6: Create short-term wins
Build momentum by achieving small wins, which serve as building blocks for significant change. These wins offer tangible evidence of progress, establish a pattern of success, attract allies, and deter opposition. Use these wins as learning opportunities to spot barriers and facilitators.
Step 7: Build on the change
Embed the change by incrementally building on these small wins. Do this by gathering peoples feedback into a ‘backlog’ of ideas and decide what to prioritise based on effort and impact.
Step 8: Institutionalise the change
Enhance the visibility of the change and its results. Measure and communicate results. Share success stories illustrating how the change has improved lives and work efficiency. Recognise and celebrate teams or staff members who played a crucial role in the change.
Example
Nikita is a lead nurse. Her practice recently had its RCVS Practice Standards assessment. The assessor gave the practice a deficit for wearing outdoor shoes in theatre. Nikita is tasked with addressing this deficit. She uses Kotter’s 8-step method to help manage the change:
| Step 1: Create urgency | Nikita starts by crafting a message and posts it on the staff notice board. The message explains the team have 3 months to address the deficit or risk loosing their accreditation |
| Step 2: Form a powerful coalition | Next, she identifies a core team to help her. She meets with the theatre nurse and clinical director to agree the plan and rehearse the key messaging together |
| Step 3: Create a vision | During the meeting, they also decide to tie the change in with an existing practice goal to increase its surgical caseload. They set the change as a milestone in their practice action log |
| Step 4: Communicate the vision | Over the following weeks, they talk about the change during daily huddles. Nikita reminds her colleagues on the number of weeks remaining to implement and evidence the behaviour change to the RCVS |
| Step 5: Remove obstacles | Nikita coordinates with the practice manager to buy indoor shoes for the team and install a shoe rack. She also adds signage to the entrance of the theatre to remind the team not to enter with outdoor shoes on |
| Step 6: Create quick wins | Nikita decides to communicate the purchase of shoes and fitting of the rack as ‘phase 1’ and celebrates the accomplishment with the team during the daily huddle |
| Step 7: Build on the change | During the huddle Nikita realises that some staff members don’t like sharing shoes and are being vocal about it. She decides to update the plan and asks her colleagues to select a pair of shoes and label them |
| Step 8: Institutionalise the change | The change becomes the norm and Nikita uses a practice meeting to update the team on its success. She thanks everyone for their hard work, especially those who were impacted the most. SOPs and policies are updated to reflect the new way of work |
Top Tips
- During the initial stages, capture your key message on a presentation slide to help condense it down. Rehearse the key message with the core team so you can deliver it quickly and confidently.
- Prioritise quick wins by adopting an ‘Agile’ approach. Focus on delivering the ‘minimum viable product’—a basic solution with the most significant impact. Plan for refinement in subsequent ‘phases’.
- Ensure long-term success by keeping documentation up to date. Update any standard operating procedures (SOPs) and archive older versions. Don’t underestimate the work involved in this step!
Kotter’s 8-step method offers a proven and reliable approach for implementing change in any practice. For additional support in change management or assistance with specific challenges, reach out to VetQI